


Level-Up Your React Game with Testing
Let's step up your React skill by learning how to test a React App.


Hi folks 👋
Are you currently learning React JS or using it in your work ?
Let's step up your React game by learning how to test a React App. In this series, we will learn how to test using packages that comes bundled with create-react-app, Jest and React Testing Library. In this first part of the series, let's understand about these two packages and a simple test.
Jest
Jest is a testing library developed by Facebook to find, run tests and determine whether the tests pass or fail. It is also the test runner that recommended by React Testing Library.
React Testing Library
React Testing Library is an open-source package, part of Testing Library package. Its job is to provide Virtual DOM for the tests and interact with it while testing. For convenience, we will refer React Testing Library as RTL throughout this article.
These two packages will complement each other while testing our React app.
Getting Started with Simple Test
Let's start by using test that comes bundled with create-react-app. As you've probably done before, execute npx create-react-app project-name or yarn create react-app project-name in your terminal, then cd to your project folder and run npm test or yarn test in your terminal. You will see the following :

Wow, we pass our first test immediately :) . But how does that happen ? What are we testing ?. Sure, we will analyze how this test works.
Why the test pass ?
Let's open App.js file :
import logo from './logo.svg';
import './App.css';

function App() {
  return (
    <div className="App">
      <header className="App-header">
        <img src={logo} className="App-logo" alt="logo" />
        <p>
          Edit <code>src/App.js</code> and save to reload.
        </p>
        <a
          className="App-link"
          href="https://reactjs.org"
          target="_blank"
          rel="noopener noreferrer"
        >
          Learn React
        </a>
      </header>
    </div>
  );
}

export default App;
You can see that <a> tag containing Learn React text exist here. The test's job is to make sure that this element shows up correctly in the Virtual DOM. The test pass because it renders correctly, as you can test when running the project and inspect the element, the <a> tag with 'Learn React' is there :

How The Test Works
Now let's open the package.json file. Under dependencies, you will see :
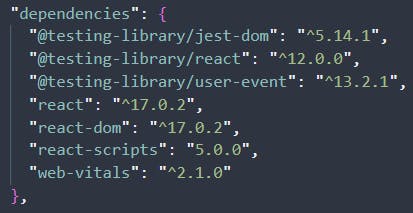
As I mentioned earlier, you can see that these packages are already installed :
@testing-library/jest-dom: RTL with Jest-DOM support@testing-library/react: RTL core package@testing-library/user-event: RTL package for handling user event
Those are packages needed to run the test. Then, let's identify the test files in src folder, that usually get deleted in almost every React tutorial video :)
setupTests.js: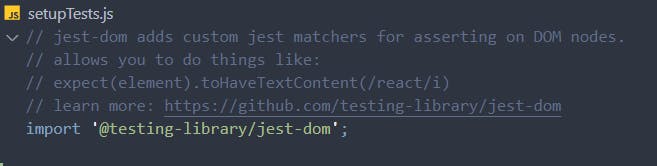
App.test.js: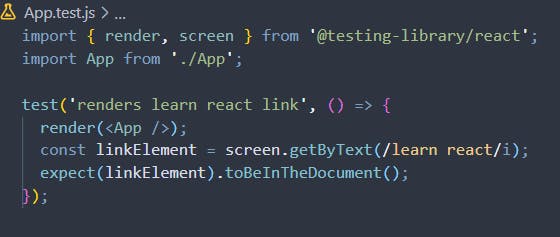
Here is where the action happens. Let's break down the code step by step :
import { render, screen } from '@testing-library/react';
import App from './App';
In this file, we import render method and screen object from RTL. render method's job basically is to give us Virtual DOM for testing, whereas screen object is where the methods for testing available for us to use to access the Virtual DOM created by render. There are many methods that we can use to test our app and we will discuss some of them later.
test("renders learn react link", () => {
   // rest of the code
});
The test() method is provided by Jest, which takes two arguments :
- A String, for test name. It can be any name you want. I recommend the name to describe what the test is about.
- A function, that contains the test. Here is where the magic happens.
Let's continue :
test('renders learn react link', () => {
  render(<App />);
  const linkElement = screen.getByText(/learn react/i);
   // rest of the code
});
What happens here is we tell RTL to get 'learn react' text in the Virtual DOM.
The render method does it job by providing the Virtual DOM for App component. We also create linkElementvariable and assign it to getByText method from screen object that accepts /learn react/i as argument. It is a Regex that means 'learn react' string and i means case-insensitive. We also can use just plain 'Learn React' string. We don't have to use Regex.
Now let's analyze the full code :
import { render, screen } from '@testing-library/react';
import App from './App';

test('renders learn react link', () => {
  render(<App />);
  const linkElement = screen.getByText(/learn react/i);
  expect(linkElement).toBeInTheDocument();
});
In the final line, what happened is we tell Jest to test whether the
linkElementexists in the Virtual DOM or not.
expect is a method called assertion in testing, provided by Jest to test our app. We then pass linkElement as an argument, since we want to test it. Then we test it with other method called matcher. As its name suggest, toBeInTheDocument() method's job is to test whether linkElement render correctly in the document (Virtual DOM). As we know earlier, it renders as it should, thus the test passes.
That's it! Now you know how this simple test works. But, this is not how test our app for production, it would be more complex and should simulate how our user interacts with the app. We will test with more example in the next part of this series.
Thanks for reading and have a good day!
Sources : jestjs.io testing-library.com/docs/react-testing-libr.. reactjs.org/docs/faq-internals.html